Affinity Designer Tool Tip | Exporting Slices

Hello and welcome!
In this installment of Affinity Designer Tool Tips, we’re going to talk about how to export individual elements from a single canvas. These individual elements are called, “slices,” and we’ll over to the Export Persona to take a closer look at how they work.
Just a note, I’m going to be using the iPad version of the app, however, if you know where the tools are located in the desktop version, the overall concept is the same.
Let’s get started!
Why Would I Use Slices?
Being able to export slices comes in handy when you’ve created a number of individual elements on a single canvas and need to use them individually elsewhere: for stickers, motifs for seamless patterns, brush source shapes and more. You can create slices out of art boards, groups and single objects on individual layers. You also have the ability to separate objects on one layer using the Slice Tool. More to come on that in a bit.
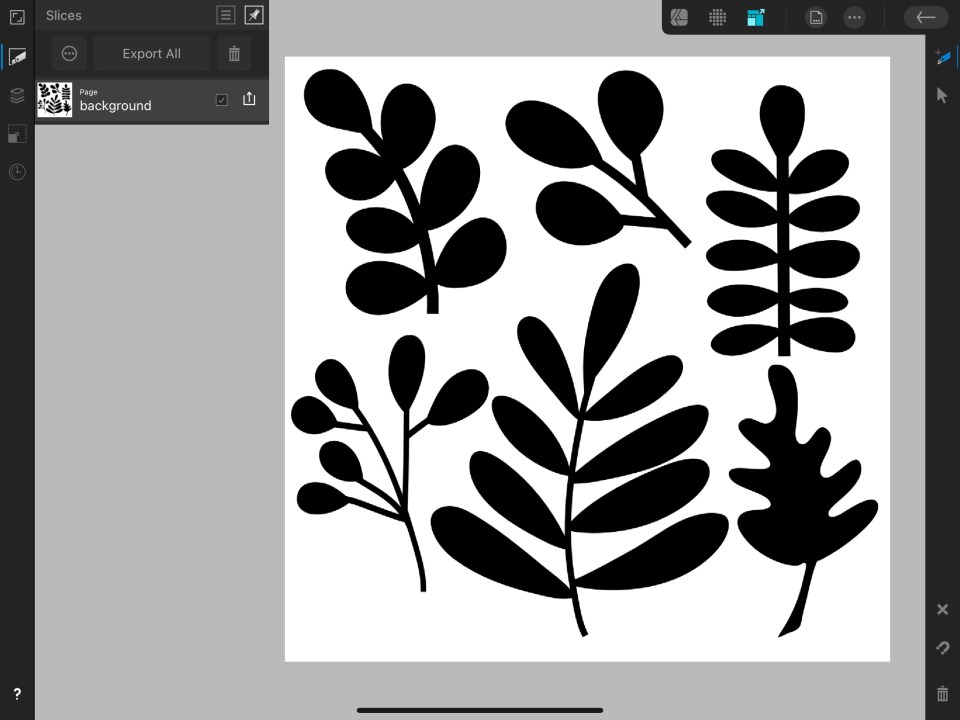
For example, I have a set of vector leaf shapes here and want to use them to create stamp brushes in Procreate . I have created them as separate layers on a single canvas, and I need each leaf to be it’s own, individual png file. The easiest way to accomplish that is to create slices out of each of the layers and export them in their own files. The Export Persona makes this super simple and allows you to export multiple, individual slices all at once.
Setting Up Your Canvas
It’s important to remember that export sizes for slices are directly linked to the dpi of your original document. This is key if you are going to to export slices as png elements where you need to maintain a certain quality.
If you have taken any of my classes, you know that I always stress that, whenever rasters are involved and your output needs to be of a certain quality (brushes, printed materials, etc), always size your document to 300 dpi and the largest size you plan to print.
Normally this doesn’t apply to flat vectors, however, if you plan to export flat vectors as png slices, you will still want to size your document so that it’s print ready.
The Export Persona
If you’re not familiar with the Export Persona, you can find it by clicking the third persona icon at the top of your screen (see below)
Quick Tip!
If you’re ever unable to find a particular icon, just click the “?” at the bottom of the screen and labels will pop up.

While you are able to export from the Designer or Pixel personas, using the Export function under the Documents menu, the Export Persona is the only space that allows you to create individual slices out of layers, groups or art boards.
The Export Persona is made up of very few tools, making it pretty simple to get a handle on.
On one side, you will see an icon that looks like a blade and one that looks like the Move tool from the other two personas. The blade will allow you to create your own slices out of the elements on your canvas, if you don’t already have them broken out in to separate layers. (if you do, then there is a much quicker way to create slices, which we’ll take a look at in a bit.
The Selection tool allows you to select your slices but not move them.

On the other side of your screen, you will see four icons. The first, which also looks like a blade, inside a partially drawn box, is your Slices Studio. This is similar to your layers studio but focuses solely on the slices you create.
The second icon is your Layer Studio, just like you have in the Designer and Pixel personas. Keep in mind, you don’t have to create a slice out of every layer in your document so your Slice Studio and your Layer Studio can look different.
The last two icons are the Transform and History Studios. I’ll be honest, I’m not entirely sure of the point of the Transform Studio in the Export Persona as it specifically transforms the slices. I find it very awkward so I don’t use it and, instead opt to use the handles to manually change the dimensions of the slice.
The History Studio, however, will allow you to back up to a certain point in the history of your canvas, just like the studio of the same name in the Designer and Pixel Personas. In this tutorial, we will not be focusing attention on either of these studios but just know that they are there.
Creating Slices
There are a couple of ways you can create slices: allowing Designer to make an automatic slice of an individual layer, art board or group, or creating your own with the Slice Tool. Which one you use will depend on your individual canvas setup. Let’s take a look at each one and how they work:
The Slice Tool
The Slice tool allows you to create your own slices from objects that are all on a single canvas. It works similarly to making a manual selection with the Move tool in that you drag a box around the shape. There are a few things you want to keep in mind when choosing this option:
- What you slice is what you get. Make sure your objects are far enough from one another that you won't accidentally include bits and pieces of another element in your slice.
- Start with a rough outline of your slice as you can always use the handles on the corner to adjust the size.
- Any space that you leave around the edges of your object are going to export with it. If you want a close crop, be sure to adjust the padding around the object, using the handles, once you place the initial box.
- The top of the slice box is the line above the thick, blue bar with the slice name and settings in it. In other words, if you don't want white space above your element, make sure your object is just under that top line; don't worry about fitting it under the blue bar.
- If you want a transparent background, make sure to turn off the white layer that Designer automatically adds to every canvas. On the iPad, go to the Documents menu, choose Canvas, then select Transparent Canvas. On the desktop version, in the Designer Persona, go to File > Document Setup > Color and choose Transparent Canvas.
- Keeping with the background theme, the same thing doesn't apply to jpegs. Jpegs don't allow for transparency so, if you export using jpeg, Designer will export your object with a white background.
Creating Slices from Layers, Groups and Art Boards
The majority of the time, this is the option I go with as I tend to create everything on separate layers so I have flexibility when editing my shapes and objects.
If you have your objects broken out in to art boards, groups or individual layers, you can simply go to the Layer Studio under the Export Persona and choose, “Create Slice.” This will automatically add a bounding box around your layer. (see the video below)
There are a few things to note when it comes to choosing this option:
- The bounding boxes Designer creates are all adjustable so, if you don't like the exact selection created, use the nodes in the four corners to adjust.
- Designer can cut it a bit close with the bounding boxes. Most of the time, I adjust mine out slightly just to give a bit more padding.
- Because everything is on it's own layer, the "what you slice is what you get," doesn't apply to accidentally slicing other objects. You do, however, want to adjust your slice so you don't have a bigger transparent (or white, in the case of jpeg) background than you want.
- Once your slices are created, you can go back to the Slice Studio and see the slices you created.
- Again, just like with the Slice Tool, pngs will be exported without a background, so long as you turn on the transparent background. Again though, jpegs will be exported with a white layer, regardless of whether you created your own background shape or not as jpegs don't support transparency.

Alright, we’ve touched on the two ways you can create slices, let’s talk now about the actual export process.
Exporting Your Slices
Now that we’ve covered how to create your slices, let’s start exporting them!
Just like the creation process, there are a couple of ways that you can export your slices, which all take place in the Slice Studio. From there, you also have the ability to tell Designer the format and resolution you want your slice to be exported at. But first, you want to make sure you set up your Export folder. Let’s take a closer look.
Setting Up Your Export Folder
When you head up to the burger menu at the top right of the Slices Studio, you will see the option to “Choose Export Folder.” (for the purposes of this lesson, we will only focus on the bottom two options; the rest have to do with UI development) From here, you can choose the folder you want your slices to head to.
One thing I have found is that, unless I actively change my folder each time I have a slice creating/exporting session, they all end up in the same folder. That said, I have made it a practice to set this first before I do anything else.

Setting the Same Slice Options for All Layers, Groups and Art Boards
Designer gives you the ability to set your export type and quality either for a group of slices, or individually.
To set your export format, and quality, the same for all slices, leave all layers unselected, and go to the three dots at the top left of the Slice Studio. Here, you can either tap the button to get the fly out selector or tap the left and right arrows. This is going to apply the same format to everything that you export.
In this same location, you can set your export dimensions to Standard, Retina or @3X, which will lend to the quality of the file of your export. For a chart on how these options affect export dimensions and dpi, head to Serif’s site and check out this post on exporting slices. (Remember, earlier I mentioned how the size of your original document plays in to these options? This is where that comes in to play and the chart will give you a good breakdown)

Setting Specific Slice Options for Individual Layers, Art Boards and Groups
To set different slice options for the various layers, art boards and groups, simply select the layers you want to apply the slice option to and follow the same process as above. Head to the three dots at the top left of the Slice Studio and select your options. Next, go back to the Slice Studio and select the other layers you want to apply different options to and follow the same steps.
When you are done, you will notice the information in the blue box at the top of each slice changes based on the selections you made. Take a look at the video below and you’ll see how I selected png for certain layers and jpeg for others. When I’m done, the labels in the boxes at the top of their slices show the differences.

Ready for Export!
You have your export options all set and you’re ready to send them off to their designated folder! There are two ways you can do this.
Export All
Next to each slice, you will see a check box. Any layers that you have checked off, including the very first layer, labeled Page, will export if you select Export All at the top. Anything you uncheck will not export. So, before heading up to that button, make sure you have checked or unchecked everything accordingly and, once you hit the button, it will head off to the designated folder.
Individual Exports
You can also export layers one by one by tapping the Export icon at the far right of the layer. When you do, you will receive the same message as you do with Export All, but in this case only a single layer (or group, art board, etc) will be exported.
Continuous Export
Alright, one final thing I want to show you and this may be my favorite of all. By selecting “Continuous Export,” in the burger menu at the top right of the Slices Studio, you are telling Designer to automatically update any changes you make to a particular slice.
For example, I can change the color of one of the leaves that I exported by going back to the Designer persona, selecting the layer and making the color change. Designer will then automatically export the slice and that slice will be updated in the export folder I designated. Take a look at the video below.

That's It! You're Ready to Start Exporting Slices
Once you get the hang of creating the slices and setting your options, exporting slices is a quick and easy way to export individual layers, groups and art boards. If you have any questions, please don’t hesitate to ask in the comments below, or by reaching out to me at hello@traceycapone.com.
I should note, Affinity Photo also has an Export Persona, as well as the ability to create slices, and it works the same as it does in Designer.
Thank you so much for joining me here for this installment of Tool Tips! Be on the lookout for more, not just from the Affinity Suite but Adobe, Procreate and more!
Have a tool you want to learn more about? Let me know in the comments below!
Want to Learn more About Affinity Designer?
Want to learn more about using Designer for your graphic design and illustration projects?
Check out my series of Affinity Designer classes here on my Skillshare channel. If you’re brand new to the app, I recommend starting with my Beginner’s Guide to Affinity Designer class, which you can find here. I have a number of other classes that build on that class on my Skillshare channel as well as short form tutorials that complement them, here on my YouTube Channel.
If you aren’t already a Skillshare member, come join me! By clicking on either of the links above, you will receive one full month to try out the site and take unlimited classes, not just by me, but by tons of other amazing teachers. Hope to see you there!

About Tracey

Tracey Capone

You May Also Like

botanical portrait series: orange ranunculus
March 8, 2018
Life of an Artist | Competition vs. Comparison (and Robbing Yourself of Joy)
February 11, 2019