Affinity Designer for iPad: Creating Textured Styles

Hello and welcome to my tutorial all about how you can easily create, and save, textured styles in Affinity Designer. While this tutorial is geared towards the iPad version of the app, the process is exactly the same for the desktop version. Best of all, any styles you create in Designer can be imported in to both Photo and Publisher and used there as well. Let’s get started!
What is a Style?
A style allows you to save a stack of non-destructive effects, such as Fill/Stroke, effects created in the Layer FX Studio as well as gradients and transparencies created with the Fill and Transparency tools, on one shape for use in other shapes and text. Styles are application wide so once you create them, they are there no matter what document you are in.
When would I use a Style?
Styles are a quick and easy way to add effects to shapes when you are looking for consistency. For example, take a look at the digital journal I created in Publisher and Designer. Throughout the planner, I have a number of active buttons like the “Go to the Video” button, and, while they aren’t necessarily the same shape, I want the effects on them (i.e. drop shadow, bevel, etc) to be consistent. So, in order to avoid having to “reinvent the wheel,” each time, I save the style I like on the first shape I create then just add them to any subsequent shapes.

What about Assets or Copy/Paste Style?
Both are definitely ways you could either transfer a style or save it for future use but there are drawbacks to both.
With Copy/Paste Style, you would always be dependent on that original shape, even if you’re in a completely different document. So, if I set effects on a circle in one document, and want the same exact effects, at the same settings, on a square I create in another, I would need to go back in to that original document, select and copy the effects then paste them in to the shape in the new document. Not at all expedient right?
With Assets, while it is application wide, it would save the original shape, in addition to the effects. So, while I could pull it in within any document, if I wanted the effects applied to a different shape, or text, I would need to either copy and paste the effects from the shape I pulled from Assets (then delete it) or adjust the shape once I pull it in. Again, not really an effective use of time.
The benefit of Styles is that it allows you to save just the effects and quickly, and easily, add it to any shape, or text, you create in future documents.
OK, great so how do I create a Style?
First, let’s locate where you can access them, because they don’t have their own studio; they’re embedded in to the Layer FX Studio.

Once you’re in Styles, you can use the Default styles that are baked in to Designer or you can create or import new ones. Everything is done from the burger menu at the top of the section.

Go ahead and choose, “Add Category.” This is going to create an “Unnamed,” category which you can rename by going back in to the burger menu. From there, you can start creating your first style!
OK, let’s start with a simple style first…
Create a new shape or text, your choice. I’m going to go ahead and create a flat rectangle in a peach fill. Next, with the shape selected, go in to your Layer FX Studio (reminder: if you ever have trouble locating a studio or tool, just tap and hold the question mark at the bottom of the screen and labels will pop up) and add whatever effects you would like. I have gone ahead and added a Bevel and Emboss as well as a drop shadow to give it button type feel.
A quick note, Styles will only save effects you add, it will not save any changes you make to the shape itself. In other words, if you change the shape from a regular rectangle to a rounded rectangle, it won’t save that.

Now that I have my effects in place, I want to save them to my Styles. I’ll make sure my shape is selected with the Move tool then go in to the Styles fly out, tap the burger menu and select, “Add Style From Selection.”

And that’s it! You have saved your first, simple style. Easy right? Well, what if you want to add some texture to the mix?
Normally, when I add texture, if I don’t add it with brushes, I use a texture image file that I place with the Place Image function under the Documents menu or that I find in the Stock Studio. From there, I clip it to the shape, change my blend modes and I’m all set. Remember though, Styles only saves effects you add, not changes you make to the shape itself, which means it won’t save anything you clip to the shape. So, we need to approach it differently.
Enter the Fill Tool…
For this, you will need a texture image file saved somewhere you can access it from Designer. Given their size, I save mine to iCloud rather than on my iPad but you can save yours wherever is most convenient for you. The Fill Tool will only give you the option of going to a folder, not Photos on your iPad so keep that in mind when you’re saving.
Select your shape, then select the Fill tool. (again, tap the question mark at the bottom if you have trouble locating a tool) Drag across the shape so that the Fill Tool’s contextual menu pops up at the bottom.

Under, “Type,” tap the arrow until you get to “Bitmap.” This is going to automatically take you to your folders so you can access the saved texture file.
Select your file and it should automatically populate the fill within the shape you created. It will look something like this:
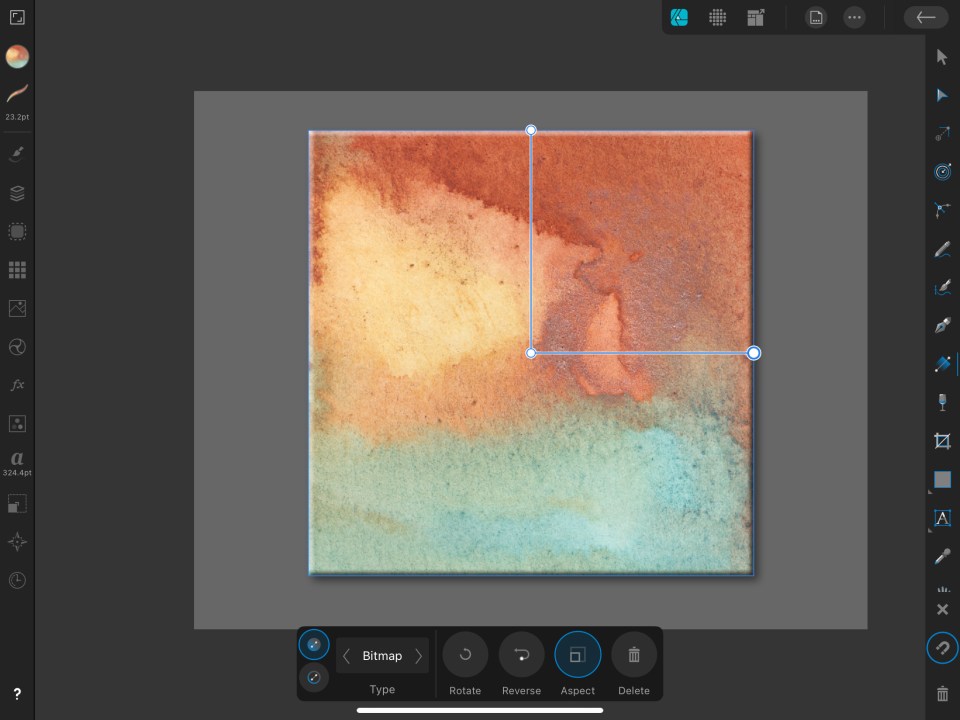
Use the handles to drag out the texture file the way you would like. You can also use the corner node to move it around on the shape to where you would like to place it.
Once you have placed the texture where you would like and added any other effects (i.e. from the Layer FX Studio, etc), select your shape with the Move Tool, go back to Styles under the Layer FX Studio and select “Add Style From Selection.” You’re done! Now, you have a shape saved not just with effects from the Layer FX studio but also texture using the Fill Tool.
Remember, all of these, including the texture, are non-destructive so, if you add them to a different shape and want to tweak it, you can easily do so, simply by going back in to the individual tools and studios and making adjustments.
One last thing before we go!
Above, I mentioned that Styles don’t just apply to shapes, they also can be applied to text as well! Take a look at the screen grab below:
So there you have it! How to create, and save Styles so that you can quickly, and easily add consistent effects to any shapes or text you create using Designer, Photo or Publisher.
Want to see the video version of this tutorial? Check it out on my YouTube Channel at the video below. If you would like to check out my entire line of full classes on Affinity Designer, take a peek at my Skillshare Channel. If you aren’t already a member, you will receive one month of unlimited classes so you can check out mine as well as tons of amazing classes from other teachers as well.
This tutorial was a request from one of my Skillshare students. If you have an idea for a tutorial or even a full length class, I would love to hear from you. Feel free to leave a comment below or contact me directly at hello@traceycapone.com.
Thank you for joining me and Happy Creating!


You May Also Like

New Skillshare Class: Symmetrical Florals With the Symbols Studio in Affinity Designer for iPad

How to Blend Text in Adobe Illustrator for iPad
